 commitlint
# commitlint
commitlint可以配置一些规则,去验证
commit message是否符合要求。
一般配合git钩子commit-msg去使用。
这样每次 commit 的时候都会由 commitlint 对 commit message 进行一次检验。验证失败的话,就终止这次提交了。
# 安装
yarn add @commitlint/cli @commitlint/config-conventional -D
- @commitlint/cli commitlint
- commitlint 官方命令行工具,要使用commitlint,必须安装
- @commitlint/config-conventional
- commitlint 官方推荐规范,有检查工具,还要知道根据什么检查嘛,所以要安装这个规范。
- 但是社区很多使用cz-customizable自定义验证规则的,那么就不需要安装这个
@commitlint/config-conventional依赖
- commitlint 官方推荐规范,有检查工具,还要知道根据什么检查嘛,所以要安装这个规范。
# 配置
根目录创建commitlint.config.js配置文件,其实配置文件与eslint很像。
// commitlint.config.js
module.exports = {
// 继承的规则
extends: ['@commitlint/config-conventional'], // 继承官方推荐规范
// 可以自定义一些规则去覆盖
rules: {
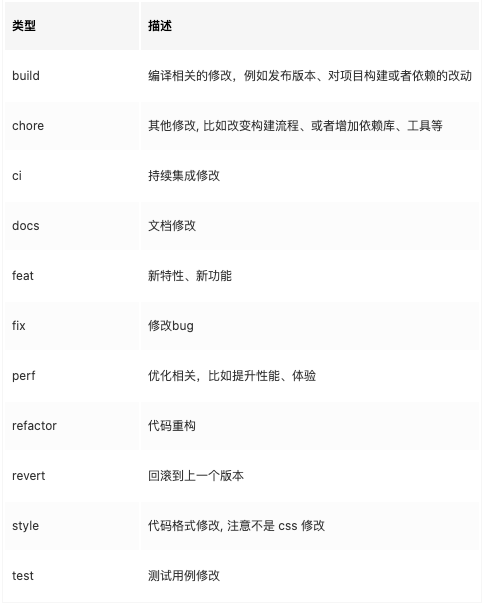
// type 类型定义,表示 git 提交的 type 必须在以下类型范围内
'type-enum': [
2,
'always',
[
'feat', // 新功能 feature
'fix', // 修复 bug
'docs', // 文档注释
'style', // 代码格式(不影响代码运行的变动)
'refactor', // 重构(既不增加新功能,也不是修复bug)
'perf', // 性能优化
'test', // 增加测试
'chore', // 构建过程或辅助工具的变动
'revert', // 回退
'build' // 打包
]
],
// subject 大小写不做校验
'subject-case': [0]
}
}
2
3
4
5
6
7
8
9
10
11
12
13
14
15
16
17
18
19
20
21
22
23
24
25
26
27
我们可以在终端执行 echo 'feat: bar' | npx --no-install commitlint类似命令,来验证提交是否符合规范。
# 遇到问题
问题1:
如果终端执行遇到下面问题

这是编码问题,记事本打开ommitlint.config.js,改为utf8就好了
# 使用
husky配置git钩子npx husky add .husky/commit-msg 'npx --no-install commitlint --edit "$1"'
这样每次git commit时,就会先使用commitlint去验证了。
# commitizen
上面虽然定义了提交规范,但是
git commit时,仍然需要手敲,有些费时间。
基于这个问题,有了commitizen,只需要执行git cz后,选择规范,真正需要填写的地方再手敲,大大节省了时间。
# 安装
1.本地 npm install commitizen -D
2.全局 npm install commitizen -g
# 配置
我们一般都采用符合 Angular 的 Commit message 格式的提交规范(当然也可以自定义,后面会讲到~)。 运行以下命令生成符合 Angular 提交规范格式的 Commit message。
- npm
npx --no-install commitizen init cz-conventional-changelog --save-dev --save-exact - yarn
npx --no-install commitizen init cz-conventional-changelog --save-dev --save-exact
可以在package.json中看到,自动的新增了以下内容
{
  ...
  "config": {
    "commitizen": {
      "path": "./node_modules/cz-conventional-changelog"
    }
  }
  ...
}
2
3
4
5
6
7
8
9
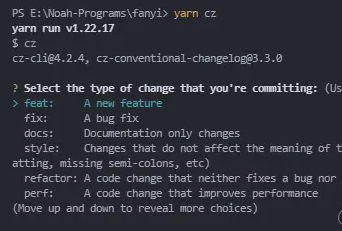
运行yarn cz就可以去提交代码了,如果是全局安装的commitizen,可以直接使用git cz。
# 自定义commitlint规则
如果需要自定义commitlint规则,我们需要安装
cz-customizable来实现自定义 commit message 规则,并安装commitlint-config-cz来配套校验(直接从自定义的文件里读取规则)
- 执行
yarn add commitlint-config-cz cz-customizable -D进行安装。 - 在项目根目录,创建一个
.cz-config.js文件,并复制官方示例cz-config-EXAMPLE.js (opens new window) 中的内容到其中。然后改成我们自己需要的规则就可以。
下面是份写好的:
module.exports = {
  types: [
    { value: "feat", name: "feat: 一个新的特性" },
    { value: "fix", name: "fix: 修复一个Bug" },
    { value: "docs", name: "docs: 变更的只有文档" },
    { value: "style", name: "style: 代码风格,格式修复" },
    { value: "refactor", name: "refactor: 代码重构,注意和feat、fix区分开" },
    { value: "perf", name: "perf: 码优化,改善性能" },
    { value: "test", name: "test: 测试" },
    { alue: "chore", name: "chore: 变更构建流程或辅助工具" },
    { value: "revert", name: "revert: 代码回退" },
    { value: "init", name: "init: 项目初始化" },
    { value: "build", name: "build: 变更项目构建或外部依赖" },
    { value: "WIP", name: "WIP: 进行中的工作" },
  ],
  scopes: [],
  allowTicketNumber: false,
  isTicketNumberRequired: false,
  ticketNumberPrefix: "TICKET-",
  ticketNumberRegExp: "\\d{1,5}",
  // it needs to match the value for field type. Eg.: 'fix'
  /*
  scopeOverrides: {
    fix: [
      {name: 'merge'},
      {name: 'style'},
      {name: 'e2eTest'},
      {name: 'unitTest'}
    ]
  },
  */
  // override the messages, defaults are as follows
  messages: {
    type: "选择一种你的提交类型:",
    scope: "选择一个scope (可选):",
    // used if allowCustomScopes is true
    customScope: "Denote the SCOPE of this change:",
    subject: "简短说明(最多40个字):",
    body: '长说明,使用"|"换行(可选):\n',
    breaking: "非兼容性说明 (可选):\n",
    footer: "关联关闭的issue,例如:#12, #34(可选):\n",
    confirmCommit: "确定提交?",
  },
  allowCustomScopes: true,
  allowBreakingChanges: ["feat", "fix"],
  // skip any questions you want
  skipQuestions: ["scope", "body", "breaking"],
  // limit subject length
  subjectLimit: 100,
  // breaklineChar: '|', // It is supported for fields body and footer.
  // footerPrefix : 'ISSUES CLOSED:'
  // askForBreakingChangeFirst : true, // default is false
};
2
3
4
5
6
7
8
9
10
11
12
13
14
15
16
17
18
19
20
21
22
23
24
25
26
27
28
29
30
31
32
33
34
35
36
37
38
39
40
41
42
43
44
45
46
47
48
49
50
51
52
53
- 创建完
.cz-config.js文件后,我们需要回到package.json文件中,将config.commitizen.path更改为"node_modules/cz-customizable" - 【这条可以不配置】如果你的.cz-config.js文件在项目根目录下,那么可以不配置
cz-customizable.config,commitlint-config-cz 会自动在项目根目录下寻找:.cz-config.js或.config/cz-config.js
// package.json
// ...
{
  "config": {
    "commitizen": {
      "path": "node_modules/cz-customizable"
    },
    // 如果你的.cz-config.js文件在项目根目录下,那么可以不配置下面这条,commitlint-config-cz会自动在项目根目录下寻找: .cz-config.js 或 .config/cz-config.js
    "cz-customizable": {
      "config": "你的文件路径/xxxconfig.js"
    }
  }
}
// ...
2
3
4
5
6
7
8
9
10
11
12
13
14
更改commitlint.config.js,extends改为cz
module.exports = {
// extends: ["@commitlint/config-conventional"],
  extends: ["cz"],
};
2
3
4
完结,撒花🎉